
How to Hang a Bear Bag: The Right Way
/
Proper food storage is important in the backcountry. If certain steps are not taken, you could get a visit from an unwelcome guest, such as a small rodent or bear, to your campsite at night. Once these animals know where they can get a easy meal, you can be sure they will return becoming a nuisance to all backpackers in the area.
The most popular method to protect and store your food is by hanging it from a tree in a bear bag.

What Is a Bear Bag?
A bear bag is a waterproof bag with a roll-top closure that protects food and other items from the weather, animals, and bugs. I recommend the Hiltop Pack ECOPAK bear bag, which is ultralight and affordable.
Now bears have an extraordinary sense of smell. It's estimated that their ability to smell things is so acute that it's about 7 times greater than a bloodhound's ability and 2,100 times better than humans. So, that means whatever is in your food bag a bear can certainly smell it.
However, there is a special odor-proof liner that you can get for your bear bag called an Opsak Bag. The Opsak is a specially designed bag that acts as a barrier to all odors thus significantly reducing the ability of a bear smelling the contents of your bear bag.
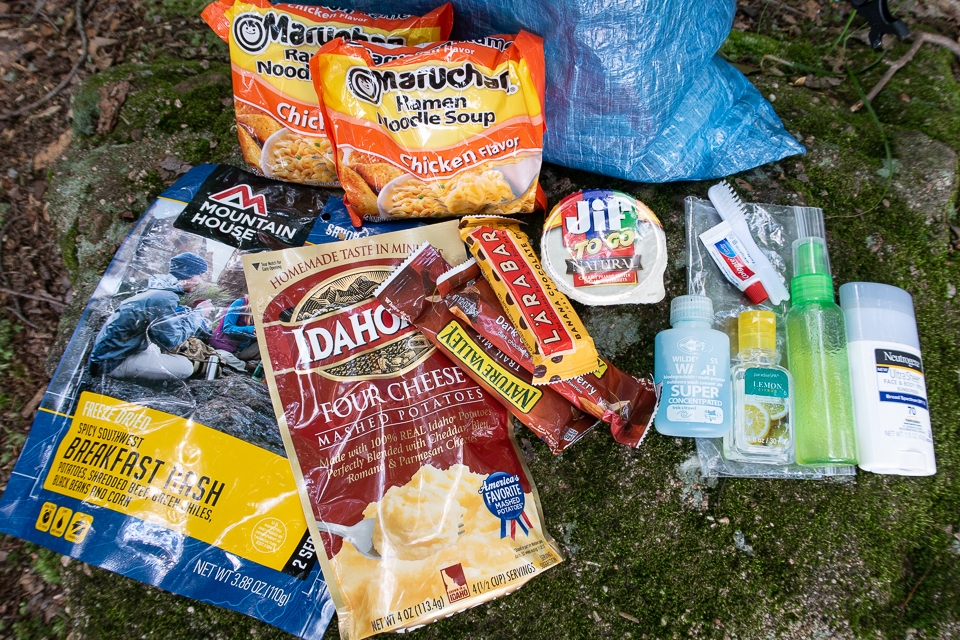
What to Put in Your Bear Bag?
You might be thinking this is a silly question. You put food in your bear bag, duh. Well, that is true, but animals will be attracted to any strong-smelling items, such as bug spray, sunscreen, toothpaste, and deodorant. So, all of these items also need to be stored in your bear bag.
How to Hang a Bear Bag
There are many ways to hang a bear bag. One common method I have seen on the trail is to simply throw a line over a branch, attach the bear bag on one end of the line, pull it up high in the air, and then tie the other end of the line to a tree. The problem with this method is that bears are smart. They will eventually find the line attached to the tree and cut it with their claws. And there goes your food.
A better and more secure way to hang your food is using the PCT (Pacific Crest Trail) style bear hang. Here is a step by step process on how to do that. Plus, there is a video down below for further instruction.
Equipment
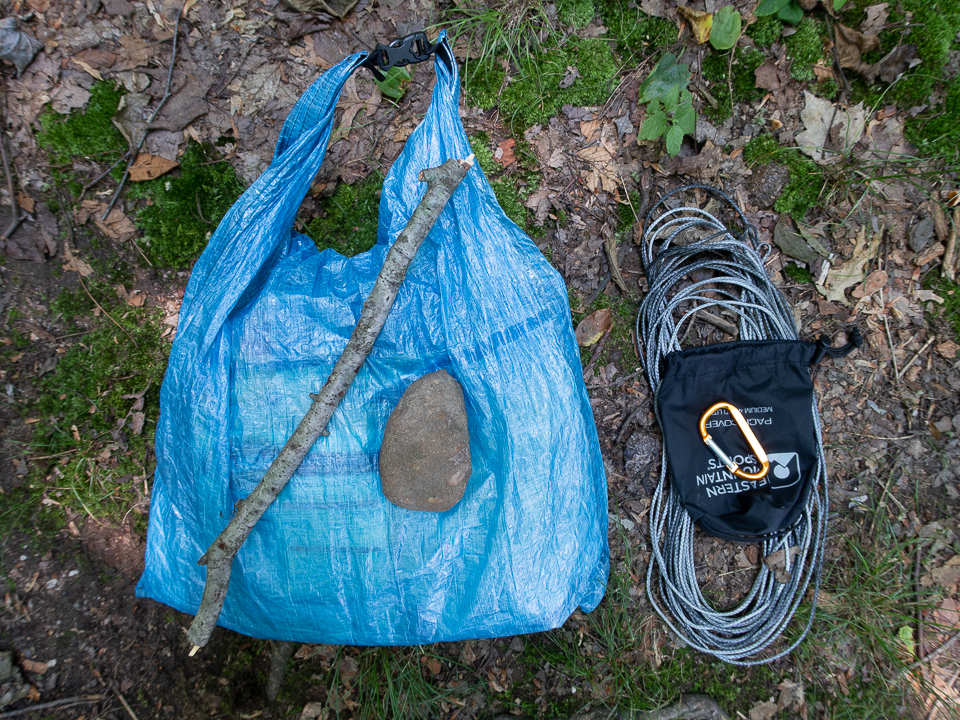
Small stuff sack (rock bag)
Waterproof dry sack (bear bag)
Small rock
Small stick
Step 1: Find a tree with a suitable branch
The tree needs to be 100 ft away or more downwind from your campsite. The branch should be around 20 ft from the ground and the end extended out at least 6 ft from the trunk of the tree.
The branch should also be big enough to support the weight of your bag, but not too big that a bear could climb out on it.

Step 2: Prepare your rope to throw it over the branch
Make a loop at one end of your rope. Attach the carabiner to the loop. Then attach your rock bag to the carabiner. After that place a rock into your rock bag. Now your rope has a weighted end to it which will make it easier to throw over the tree branch.


Step 3: Throw the rock over the branch
Tie the loose end of the rope to a small bush nearby so you don't loose your whole rope in the tree when throwing it. Now the challenging part. You want to try to throw the end of the rope with the rock bag over the tree branch. This can take several attempts. Aim for a part of the branch about 4 feet away from the trunk.


Step 4: Attach and hoist the bear bag up to the branch
Once you have made it over the branch, lower the rock bag and replace it with the bear bag. Then feed the free end of the rope (that was attached to a small bush) through the carabiner and then pull your bag up all the way to the tree branch. (click on images to enlarge)


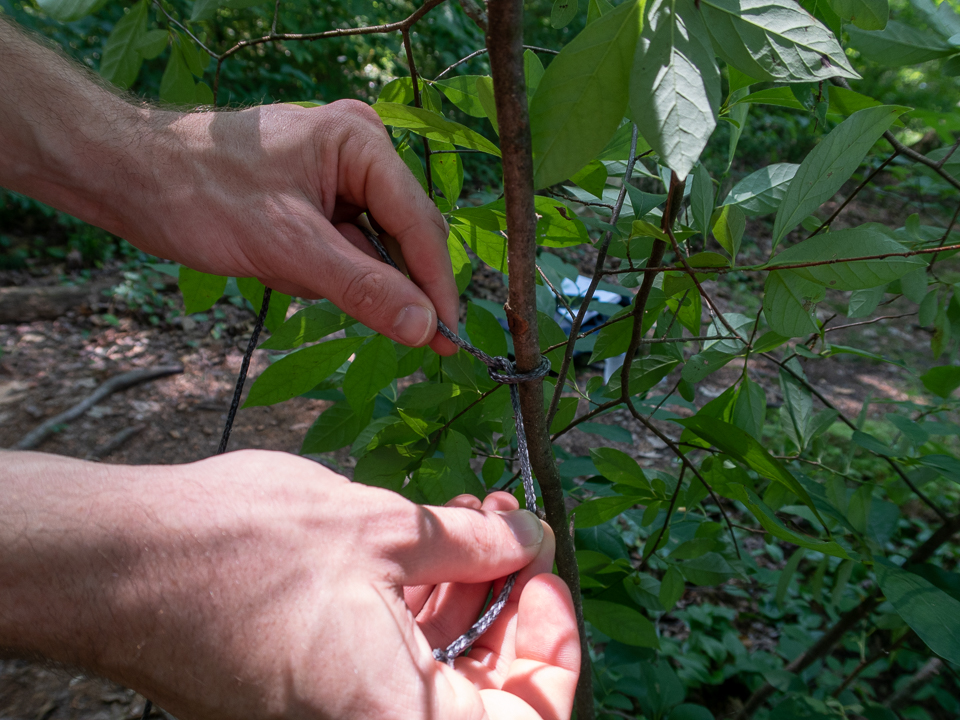
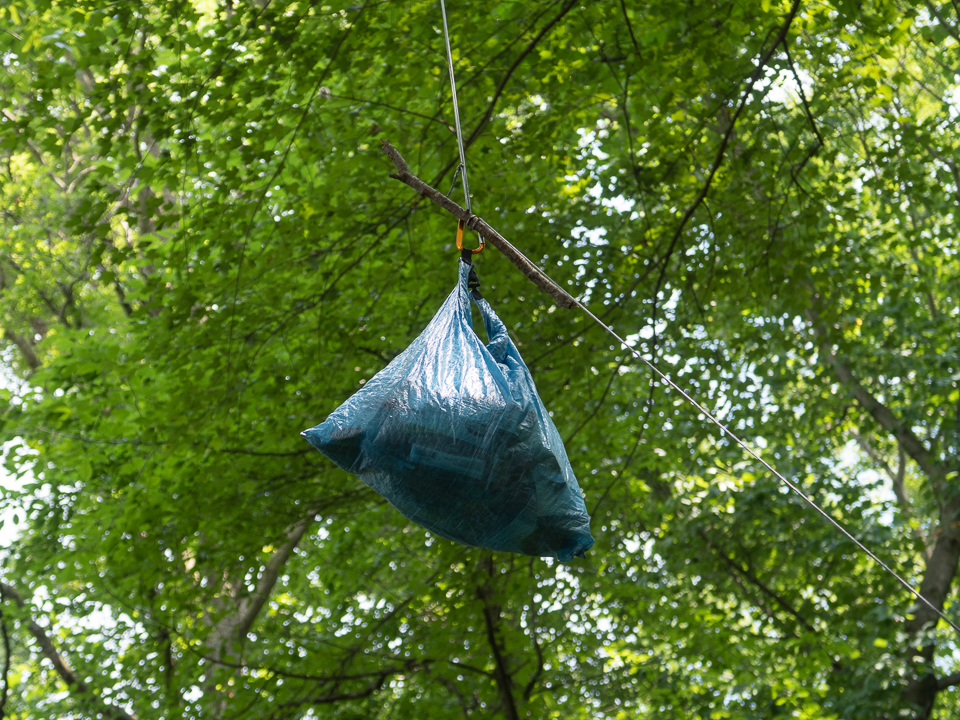
Step 5: Attach the stick to your line
With your bear bag still up high touching the branch, grab the small stick you picked out, reach up as high as you can and attach your stick to the rope using a clove hitch knot. To do this, please watch our video down below in addition to looking over the following written instructions and pictures.
Clove Hitch Knot: (1) Keep a hold of the rope with your right hand, (2) grab the middle of the stick with your left hand, (3) then place the stick horizontally in front of your rope. To stabilize the weight of the bear bag (4) secure the rope in between the ring and middle finger of your left hand. (5) Then with your right hand wrap the loose end of the rope up and around the stick once. (6) Then secure the rope in place with your right thumb while gripping the stick with your right hand. (7) Take the loose end of the rope in your left hand and form a loop at the left end of the stick. (8) Then slide the loop onto the stick and (9) let the loop tighten around the middle of the stick into a clove hitch knot. (10) Now, before you let go of the stick, keep a hold of the rope, or else your bear bag will come crashing down. (11) Now let go of the stick. (Click on images to enlarge.)


Step 6: Release the stick to your bag
With the stick now attached to the rope, slowly release the rope and gently let down the bear bag. The stick will act as a stopper and prevent the bag from falling all the way down, thus leaving it suspended in the air.
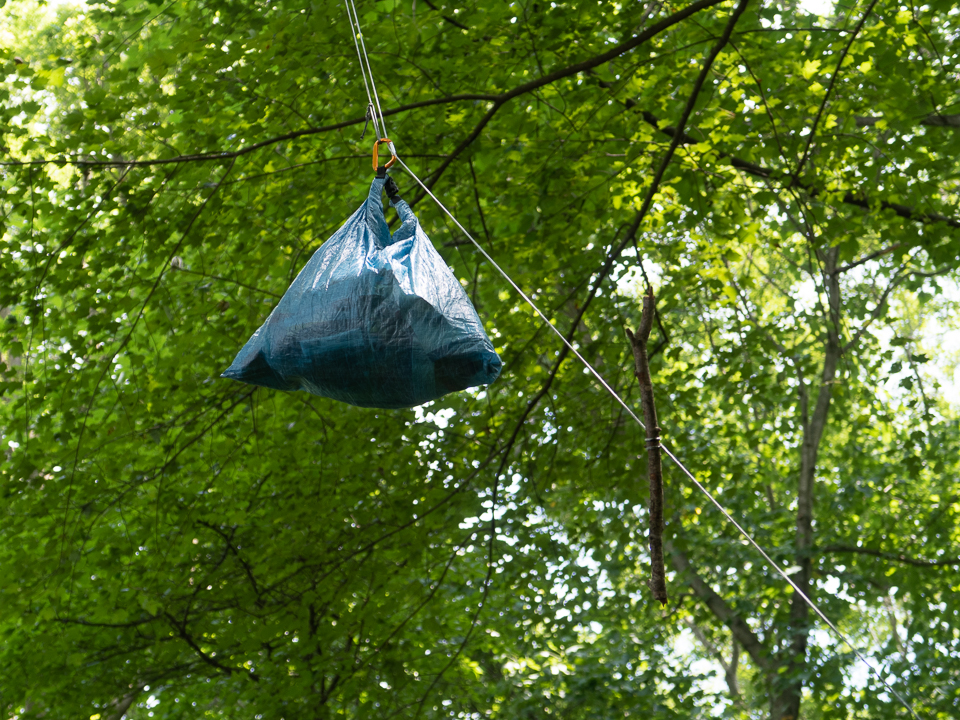
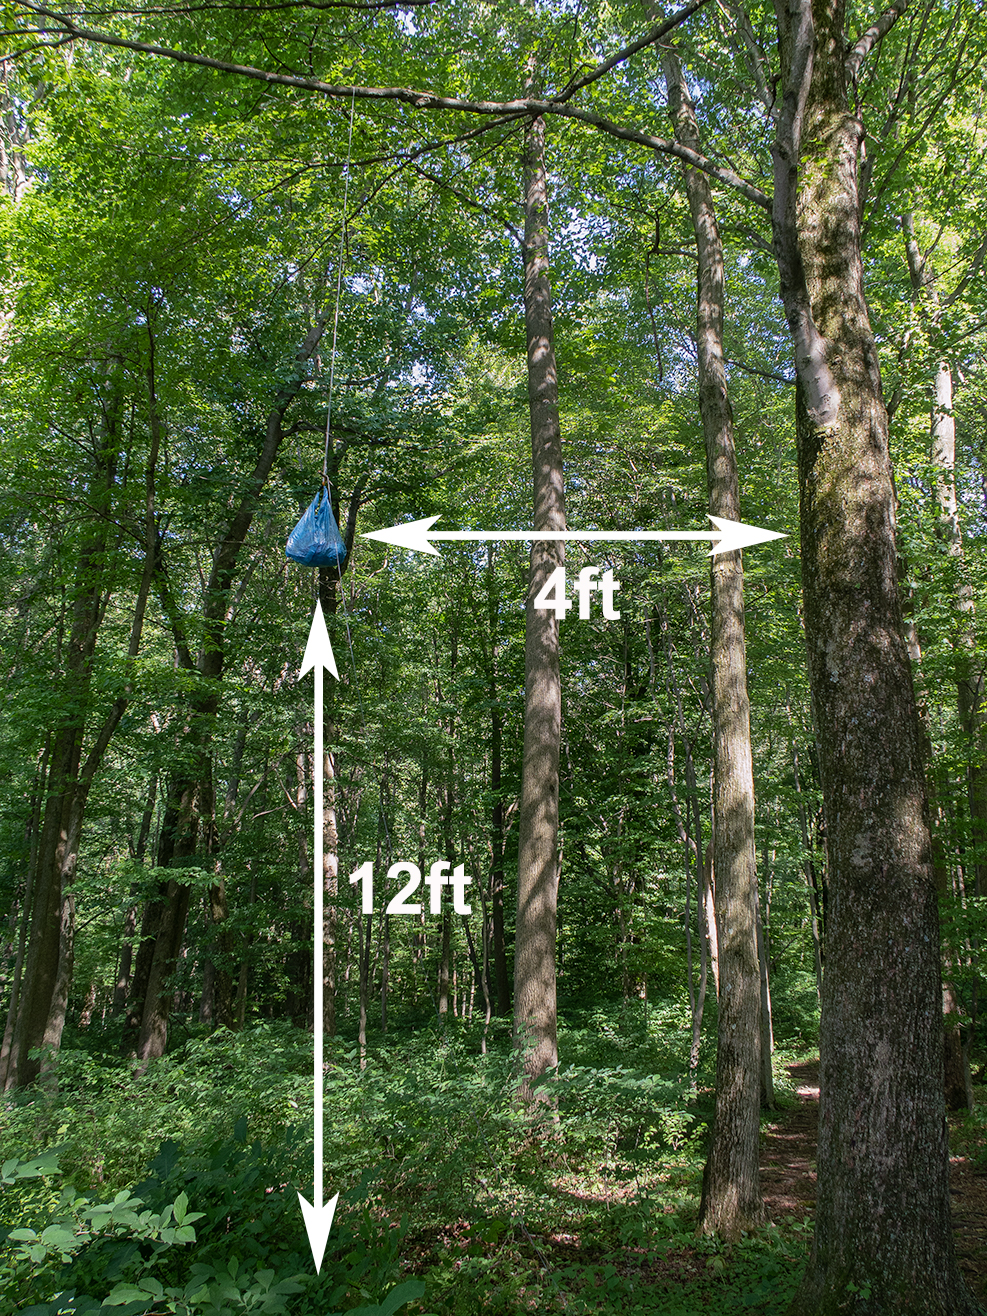
Completed PCT style bear hang
The end result should be that your bear bag is hanging safely 12 ft from the ground and at least 4 ft from the trunk of the tree.
Accessing your food/items in the morning
Pull on the rope, untie the stick, and gently lower the bear bag down. Don’t forget to take the rope and carabiner with you when you leave.
How to Hang a Bear Bag Video
PCT Style Bear Bag Hang - PROS
Harder for a bear to get at your food
Easy access for yourself to your food or other items
The whole bear bag system weighs very little
PCT Style Bear Bag Hang - CONS
Does not work well in locations where there are no trees or in areas with trees that have no suitable branches (like pine forests) to hang your bag
I never had it happen to me, but you can potentially get your line tangled in the carabiner
Disclaimer
Some of the links above are affiliate links. If you click on them and purchase an item, I'll receive a small commission at no extra cost to you. This helps me to continually make content and keep this site going. Thanks for the support!