
Escarpment Trail Backpacking Guide
/
Escarpment Trail’s sunset rock overlook
This article may contain affiliate links.
The Escarpment Trail is located in the Catskill Mountains of New York. It's a point-to-point trail that stretches over 25 miles through both rugged and beautiful wilderness.
The term escarpment refers to when terrain abruptly changes in elevation due to a steep slope or cliff. In the Catskills, you see this first hand. You have the flat Hudson River Valley to the east. As the terrain moves west, it suddenly changes in elevation because of the Windham-Blackhead Mountain Range, with several summits towering above 3,000 feet in elevation.
The Escarpment trail traverses that mountain range and provides panoramic views of the surrounding area. In fact, some of the views above North Lake along the trail are where nineteenth-century artist Thomas Cole found inspiration for his many paintings that now hang in many museums around the US.
Additionally, on the Escarpment Trail, you'll be able to explore the wreckage of an old plane crash, and if you're willing to take a little side trip, you'll get to see the spectacular Kaaterskill Falls.
Whether you're an avid hiker seeking a new adventure or a nature lover looking to immerse yourself in the splendor of the mountains, the Escarpment Trail guarantees everyone an experience you'll never forget.
Trail Facts
Length: 25.47 miles
Trail Blazes: Blue
Duration: 2-3 days
Elevation Gain: 5,844 feet
Peak Elevation: 3,940 feet
Best Season to Hike: Spring to Fall
Difficulty Level: Moderate to Strenuous
Bear Canisters: Not required
Permits: Not required
Dogs: Allowed
Highlights
Sunset Rock
Inspiration Rock
North Point
Waterfall
Plane Crash
Boulder Rock

Escarpment Trail’s Inspiration Rock overlook
Maps & Information
141 NY/NJ Trail Conference (Catskill) Trails Map: To navigate yourself around the wilderness, I suggest using the waterproof map from the NY/NJ Trail Conference. It provides detailed information, such as elevation profiles, points of interest, mileage, and water sources.
AllTrails App: For backpackers who prefer digital maps to navigate with, the AllTrails app is great. It uses your mobile phone’s GPS to track your position on the route. You’ll find the Escarpment Trail there, along with over 400,000 other trails. The app provides you with elevation profiles, mileage, campsites, water sources, and points of interest.
Parking & Shuttle
Parking can be found at the trail's northern terminus in Windham, located at the corner of Rt 23 and Cross Road. Parking can also be found at the trail's southern terminus in Haines Falls along Scutt Road. Even though both parking lots have many parking spaces, they can fill up on summer weekends and holidays. See the interactive map below for the exact parking and trailhead locations.
Since this trail is a point-to-point hike, not a loop, there’s a shuttle service available by Catskills Trail Shuttle. They will pick you up at one of the parking lots of your choosing and drop you off at the other end of the trail so you can just hike back to your car. Here is their contact info:
Phone: (631) 495-9534
E-mail: catskillstrailshuttle@gmail.com

Kaaterskill Falls
Terrain
The terrain of the Escarpment Trail is mostly moderate, with some difficult sections. The cumulative elevation gain of the trail is a reasonable 5,844 feet. The most challenging areas of the trail are the long, steady climb up Windham High Peak and the steep, rocky climb up Blackhead Mountain.
The other peaks you'll traverse will be smaller and easier to navigate, and since you stay high up on a ridgeline, you'll be able to enjoy several easy flat sections. A few areas require rock scrambling, but mostly, you'll encounter dirt, small rocks, and roots on the trail.
With this type of terrain, it's essential to have good shoes. The last thing you want to do is slip on a rock or get a blister on your foot. To help prevent these things from occurring, I recommend getting the Altra Lone Peak 9 Shoes. The tread on them is exceptional, and the wide toe box keeps your feet from rubbing against each other, creating the potential for blisters.
Dangers
On the Escarpment Trail, one thing to be careful of is the areas where you need to do some rock scrambling. The most notable rock scramble is near the top of Blackhead Mountain. Some of these areas require using your hands and legs to navigate these climbs.
Another thing to be aware of is that there are very few water sources along this trail. The danger of running out of water and becoming dehydrated is real. Even a lot of the camping spots aren’t near a water source. When I dry camped on North Mountain, I had to carry 4 liters of water to camp. So, make sure to have plenty of water storage capacity.
For extra water storage, I recommend using the Cnoc Vecto Water Container. They’re easy to fill, lightweight, and pack down small when not in use.

Backpacking Escarpment Trail
Bugs
In the Catskills, bugs like mosquitoes and black flies can be a real nuisance in the springtime. Bug season usually starts in May and goes into June. One good thing about this particular region is that ticks aren’t a huge issue. This is probably due to the fact you don’t have to hike through long grass, and the trail is maintained well, so you don’t have to do any bushwhacking.
For the bugs that are a problem, I recommend protecting yourself by using a combination of Permethrin Spray on your clothing and Picaridin Spray on any exposed skin.
For additional precautions, you can check out my article on how to protect yourself from ticks and mosquitoes when hiking.
Water Sources
As mentioned earlier, water on the Escarpment Trail is very scarce. That's because most of the time, you're hiking up high on a ridgeline. The following is a detailed explanation of where the water sources are located.
On the first day of your hike (if you’re going southbound), you'll only have two decent water sources available. To get to the first one, at the trail intersection at mile 1.44, turn right onto Elm Ridge Trail, and in 0.2 miles, you'll reach the water source.
The other water source is at the Batavia Shelter/Tent Area at mile 9.21, where you'll most likely stay the night. To get to the water source, turn right onto the Batavia Kill Trail and hike downhill for 0.2 miles, and you’ll arrive at the shelter. To the left of the shelter is the Batavia Kill stream. It may look dried up, but if you follow the stream down, you'll find water still flowing.
On the second day, at mile 13.67, you'll reach a trail junction with the Dutcher Notch Trail. Turn left on the trail for 0.25 miles downhill, and eventually, you'll reach the water source. At this water source, you'll need to fill up four liters of water or whatever you'll need to dry camp around the top of North Mountain because there are no more water sources from here to camp.
On the last day, you'll have a water source available at the North Lake. To get to the water source, turn right at mile 21.56. Walk down a stony road for about 250 feet, passing picnic areas, and reach the lake.
One of the last water sources on the Escarpment Trail is at mile 27.07 when the trail crosses Spruce Creek by a bridge. This is the only water source that you actually don’t have to leave the main trail for.
I have all of the water sources labeled on the interactive map below. With the long distances between water sources, you must be strategic with your water carry plan. If you need help with how to come up with one, check out my article on how much water you should carry backpacking.
Make sure also to filter your water. Protozoa and bacteria are a concern. One of the best water filters on the market is the Sawyer Squeeze because it's lightweight, affordable, and has a fast flow rate.

old Plane wreckage at stoppel point
Campsites
On the Escarpment Trail, you'll want to plan where you'll camp each night. There aren't a lot of suitable camping spots compared to other trails I've been on.
One good area to camp at can be found at mile 9.21 if you're going southbound. You'll come to a trail junction with the Batavia Kill Trail. Turn right onto the Batavia Kill Trail for 0.2 miles and arrive at the Batavia Kill Shelter/Tent Area.
There are many tent spots and a shelter that can fit up to 6 people. Keep in mind shelters are on a first-come, first-served basis. The camping area comes complete with a privy behind the shelter and the Batavia Kill, which provides a reliable water source.
Another nice camping spot can be found at mile 17.81 near the top of North Mountain. The campsite sits among spruce trees, making for a nice atmosphere. The one downside is that it's a dry campsite. Meaning there are no water sources nearby. You'll have to make sure to carry extra water for camp. That's what I did.
There are a few more decent campsites found throughout the trail, I have them marked on the interactive map below to help you plan your trip.
No permits are required to camp overnight along the Escarpment Trail.
The general rules and regulations for the Catskill Mountains are as follows:
No camping around the North-South Campground area. The boundary area is marked by white signs with green lettering. That means camping isn't allowed from the North Point Overlook all the way to the south end of the trail.
No camping above 3500 feet in elevation
Camping is prohibited within 150 feet of roads, trails, lakes, ponds, streams, or other bodies of water.
Use pit privies when possible. When none are available, dispose of human waste by digging a hole 6″-8″ deep at least 150 feet from water or campsites.
Fires should be built in existing fire pits. Use only dead and down wood for fires.
Carry out what you carry in. Practice "leave no trace" camping and hiking.
Observe and enjoy wildlife and plants but leave them undisturbed.

campsite at north mountain

Batavia Kill shelter
Which Direction Should You Hike?
The preferred direction to hike the Escarpment Trail is southbound. This is so you can leave the best the trail has to offer for last. The southern section has more spectacular overlooks and the Katterskill Waterfall. These points of interest will leave you with a lasting impression.
Weather would be the only thing that should make you consider changing the direction in which you hike this trail. With the southern half having the best views, you’ll want to make sure you hit that portion of the trail when the skies are clear.
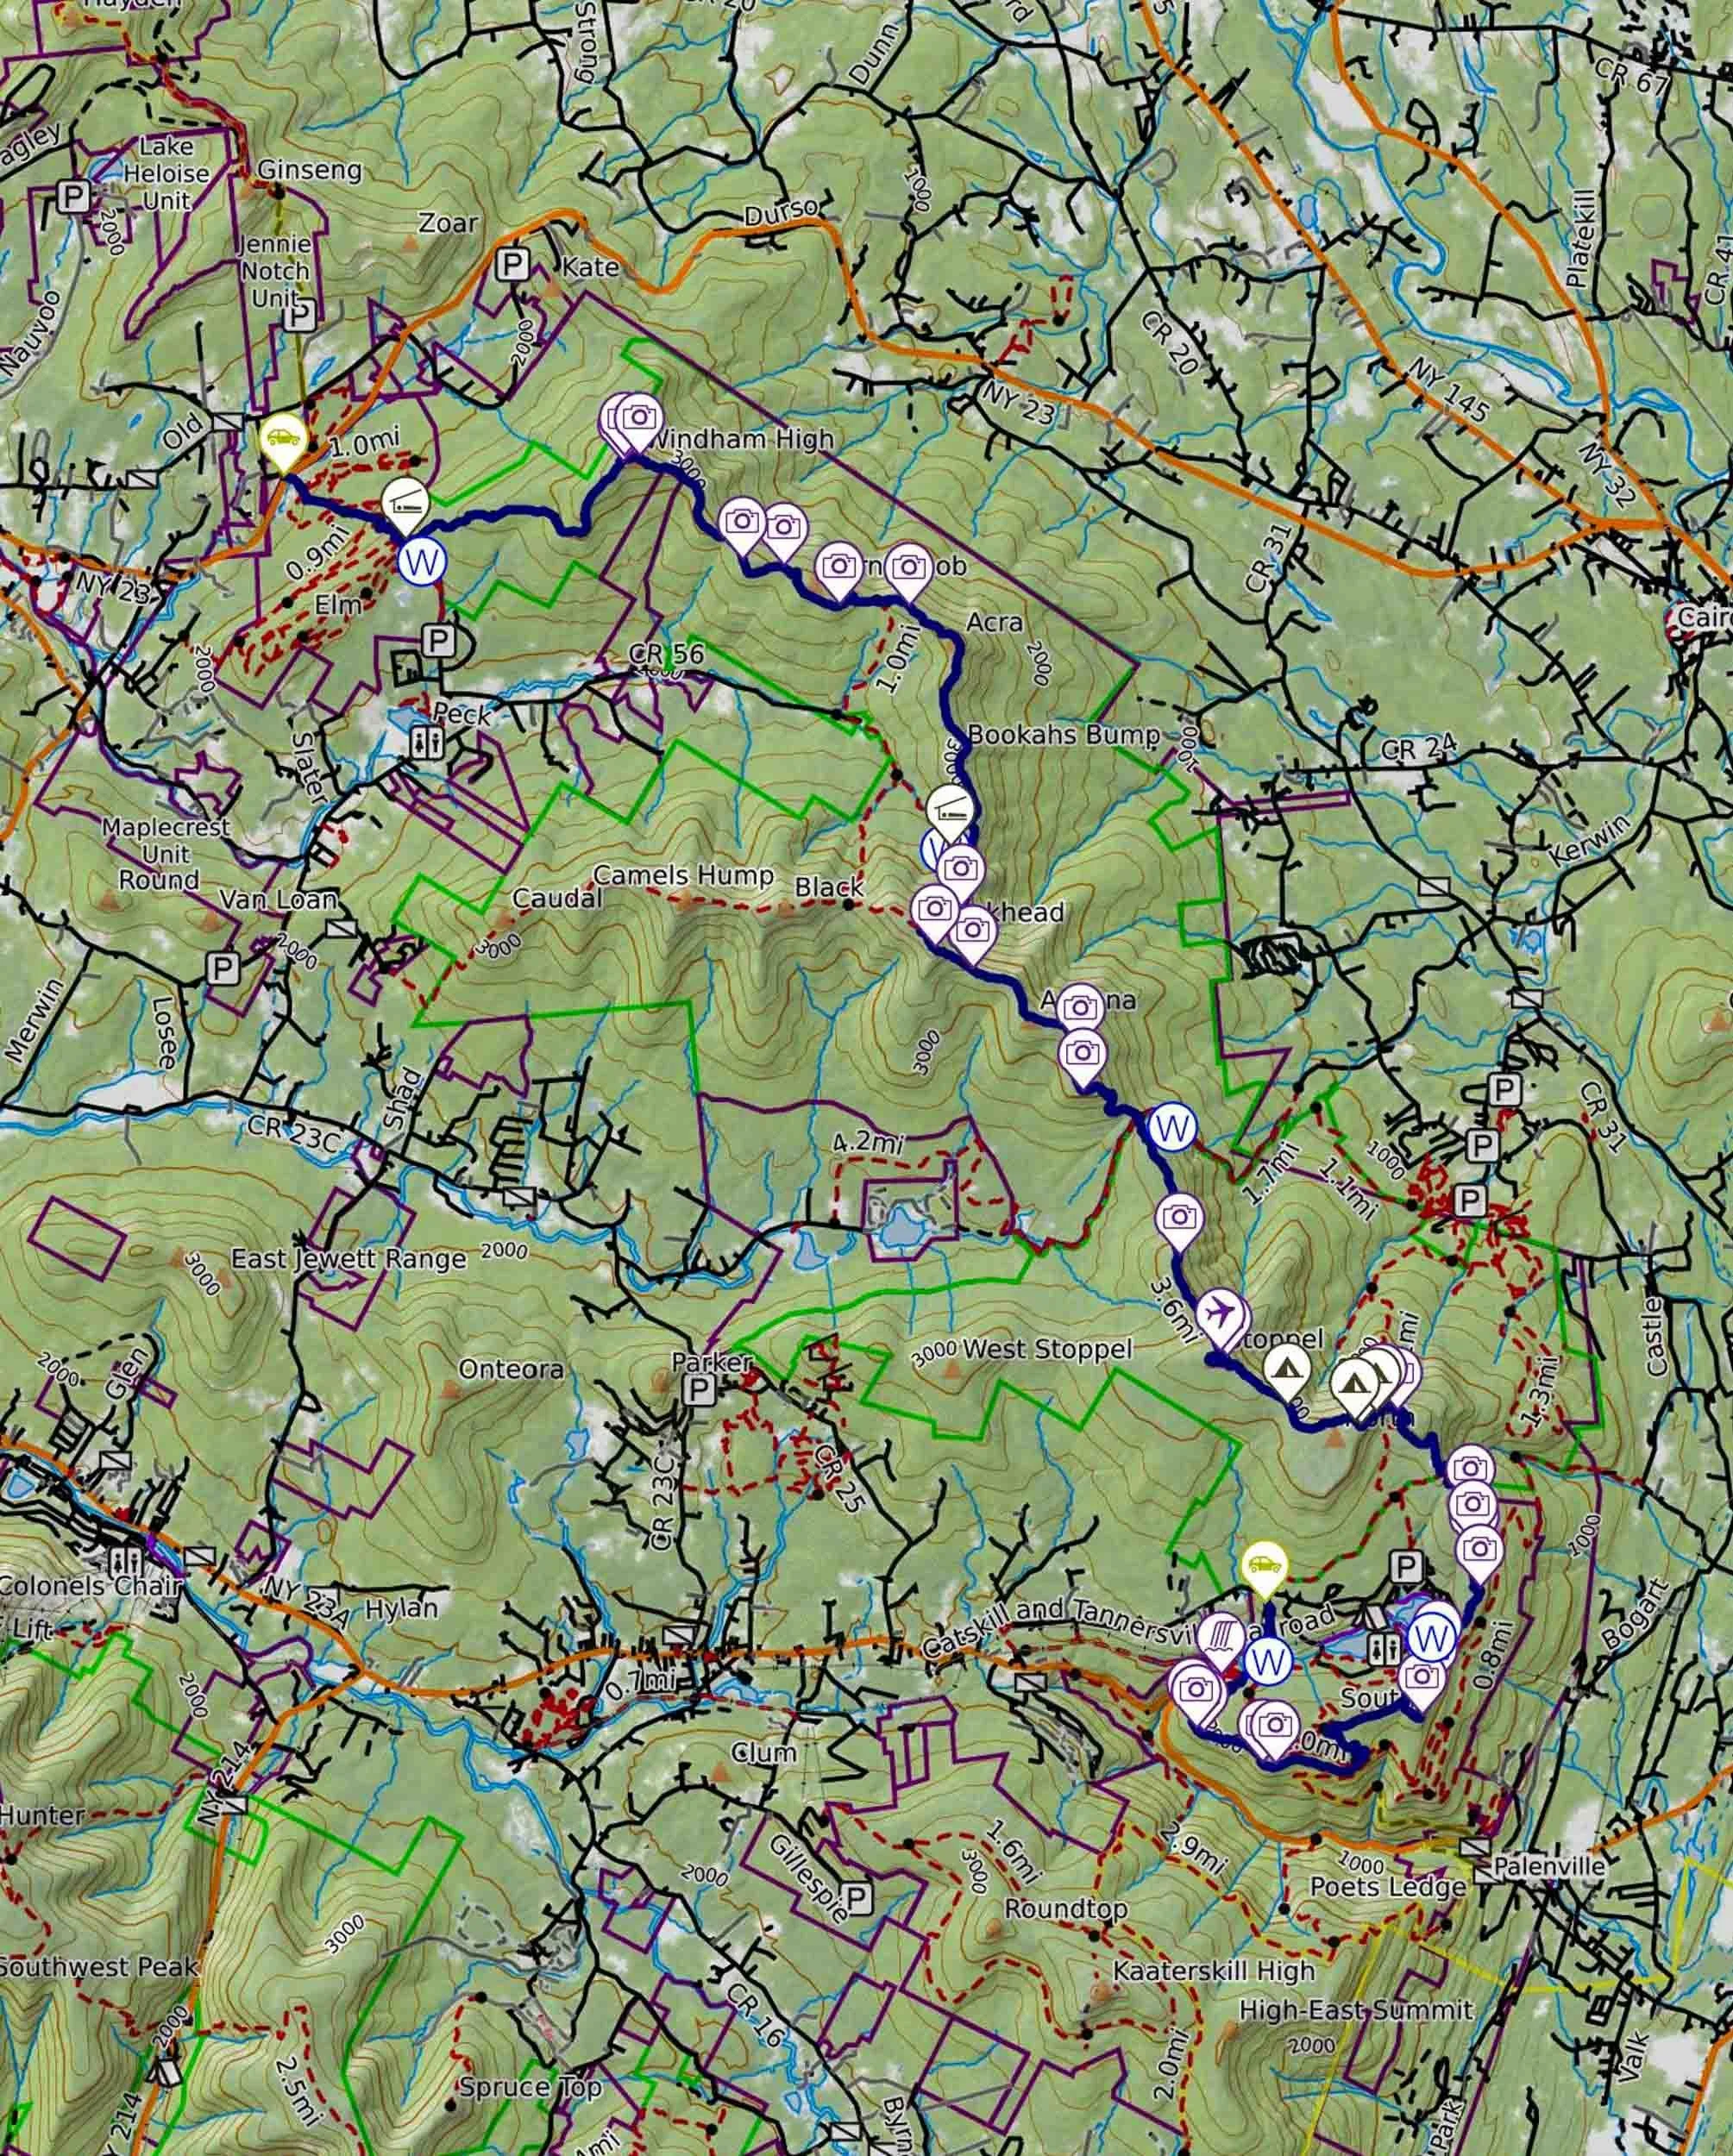
Click Here
to open an interactive CalTopo map
Trail Notes & Trip Itinerary
3-Day Trip (southbound)
Day 1: (9.21 miles)
From the parking area at the corner of Rt 23 and Cross Road, start by crossing Rt 23 and look for the sign that marks where the Escarpment Trail begins. Blue discs will mark the overall trail.
1.44 miles: After hiking steadily uphill and enduring several switchbacks, arrive at an intersection with the Elm Ridge Trail on the right. A water source is about 0.2 miles down that trail if you need to refill your water bottles.
1.47 miles: Stay straight on the Escarpment trail, and in just 100 feet, a side trail on the right leads to the Elm Ridge Lean-To with tent sites behind the shelter.
3.66 miles: Continue ascending steeply on the Escarpment Trail to just before the summit of Windham Peak. Enjoy the first of three overlooks.
3.66 miles: Directly across from the first overlook, come to the second overlook.
3.76 miles: Just past the overlooks, come to the summit marker of Windham Peak.
3.80 miles: On the other side of Windham Peak, enjoy a third overlook before you start your descent.
5.07 miles: After taking in the view, continue on the trail, descending rapidly in elevation for a while. Eventually, the trail comes to a saddle on the ridge, and then you’ll climb up a small hill and come to a view.
5.44 miles: After enjoying the view, go over the top of the small hill and, on the other side, start descending and come to another saddle on the ridge just before Burnt Knob. Enjoy another view.
6.03 miles: Climb out of the saddle to the top of Burnt Knob, where the trail flattens out for a little and comes to a view on the far side of Burnt Knob.
6.43 miles: After the view, the trail will aggressively descend to an intersection with the Black Dome Range Trail.
6.75 miles: Stay straight, and the trail ascends steeply and comes to a view.
7.14 miles: After the view, continue climbing and arrive at the top of Acra Point.
9.01 miles: After reaching Acra Point, enjoy a relatively easy section of trail all the way to Batavia Kill Trail.
9.21 miles: Turn right onto Batavia Kill Trail and reach the Batavia Lean-To and tent area. This is where you’ll camp for the night.
Day 2: (8.6 miles)
9.41 miles: Leave the Batavia Camping Area and retrace your steps back to the Escarpment Trail.
9.85 miles: At the trail junction, turn right, heading southbound. The trail starts climbing significantly in elevation. Halfway up this mountain, you’ll come to a view.
10.65 miles: After that, the trail starts getting very rocky, and you’ll have to do some rock scrambling. Eventually, you’ll reach the top of Blackhead Mountain and come to an intersection with the Blackhead Trail.
10.81 miles: Take a left, staying on the Escarpment Trail. Before the steep descent, enjoy another view.
11.12 miles: The trail then descends rapidly, and near the bottom of Blackhead Mountain, you’ll come to a view.
11.98 miles: Start climbing again, but this time not so aggressively, and arrive at the top of Arizona Mountain.
13.08 miles: Continue on a short flat section, and then the trail starts to descend mildly and comes to a side trail that leads to a dry campsite and view.
13.67 miles: After that, the trail starts to descend steeply, and you’ll have to do some rock scrambling and navigate some switchbacks down to a trail junction at Dutcher Notch.
14.17 miles: Turn left onto Dutcher Notch Trail and hike down to a spring along the trail. After refilling your water bottles, retrace your steps back to the Escarpment Trail.
15.36 miles: Start climbing out of Dutcher Notch to the summit of Stoppel Point. Halfway up, enjoy a view at Milt’s Lookout.
16.21 miles: After the lookout, the trail flattens out, then starts climbing again. Near the top of the mountain, you can explore the wreckage of an old plane.
16.43 miles: Just a short distance from the plane, arrive at the summit of Stoppel Point.
16.65 miles: At the top of the mountain, the trail flattens out, and then, just before heading down the other side, you’ll come to a view.
17.81 miles: After enjoying the view, descend steeply for a short distance, and eventually, the terrain becomes flatter for a while, and you’ll come to a dry campsite on North Mountain. It’s located about 100 feet from the trail. This is where you’ll camp for the night. (you’ll find several campsite options in this general area)
Day 3: (9.76 miles)
18.07 miles: Leave the campsite and continue heading southbound on the escarpment trail. The trail starts descending mildly and then opens up to an area with giant rock slabs. Keep an eye out for side trails. Many of them lead to views.
18.33 miles: After exploring the area, continue on to North Point, a popular overlook.
18.60 miles: Once you’re finished enjoying the view at North Point, continue on by climbing down steep rocky terrain and come to a trail junction with Mary’s Glen Trail.
19.21 miles: Stay on the Escarpment Trail by turning left at the intersection. The terrain stays mostly flat, then descends steeply and requires some rock scrambling. Come to a trail junction at Bad Man’s Cave with Rock Shelter Trail.
19.78 miles: Continue on the Escarpment Trail by turning left at the intersection. Encounter another steep rocky descent. Then, the terrain becomes flat, skirts the escarpment’s edge, and comes to Newman’s Ledge. Enjoy the view.
19.98 miles: After the view, come to a junction with a side trail leading to Lookout Rock and Sunset Rock views.
20.02 miles: Turn left onto the side trail and enjoy both views. Sunset Rock is arguably the best view of the entire trail. Retrace your steps back to the Escarpment Trail.
20.85 miles: Continue southbound on a very rocky Escarpment Trail by turning left, descending to Artist’s Rock.
21.56 miles: After the view, descend all the way down to a stone road. Turn right onto the road that leads to North Lake, where you can refill your water bottles.
21.67 miles: Retrace your steps back to Escarpment Trail and turn right onto an old forest road. Stay on it for a little and eventually turn left at a beach/picnic area sign. The road will spit you out to the old Catskill Mountain House site. Enjoy a nice view.
21.95 miles: Climb out of where the old mountain house site view is by following the trail right and eventually coming to another view.
22.11 miles: Continue climbing in elevation to a trail junction. Straight is a shortcut trail bypassing Boulder Rock, and turning left leads to Boulder Rock.
22.21 miles: Turn left to Boulder Rock View. Enjoy the view.
22.42 miles: After the view, continue right, seeing more views, and eventually, you’ll make it to the other end of the shortcut trail that bypasses Boulder Rock.
23.06 miles: Turn left at the intersection, enjoy a flat section of trail for a little bit, and eventually come to a trail junction.
23.56 miles: Turn left at the intersection. Right, will take you to the Katterskill Hotel ruins. Descend South Mountain by a couple of switchbacks and come to a trail junction.
23.62 miles: Turn right onto a horse trail following the signs for Inspiration Point. If you had turned left at the intersection, it would have taken you to the Palenville Overlook. In 100 feet, come to another trail junction.
24.19 miles: Turn left, leaving the horse trail, and the trail will start skirting the edge of Kaaterskill Cove. Eventually, you arrive at Inspiration Point.
24.52 miles: Continue on for a short distance and come to another view called Sunset Rock. Yes, two views are called Sunset Rock, which is very confusing.
24.63 miles: After Sunset Rock, enjoy one more view and arrive at a trail junction.
25.05 miles: Continue straight on the Escarpment Trail. Right, would of taken you to Schutt Road Trail. Enjoy four unnamed overlooks along the way and eventually arrive at Layman Monument.
25.55 miles: Make a sharp right, start ascending mildly, and arrive at a trail intersection.
25.95 miles: Turn left onto a side trail leading to lower Kaaterskill Falls. It’s a steep descent down steps made of stone.
26.35 miles: After enjoying the falls, retrace your steps back to the Escarpment Trail.
26.50 miles: Turn left onto the Escarpment Trail, and you’ll walk down some steps made out of stone and come to another trail junction.
26.70 miles: Turn left onto a side trail leading to the upper Kaaterskill Falls. Cross a bridge and follow a crushed stone path to a platform for viewing the upper falls.
26.90 miles: After enjoying the falls, retrace your steps back to the Escarpment Trail.
27.07 miles: Turn left onto the Escarpment Trail, which, for a very short time, is a forest road that leads you to a trail junction.
27.57 miles: Turn left, leaving the forest road and onto an actual trail. Soon, you’ll cross over a bridge, and you’ll continue through the woods and eventually arrive at Scutt Rd. The parking area is across the street.
Related Articles
Adirondack High Peaks Loop Backpacking Guide
This loop is located in the High Peaks Wilderness of northern New York. You’ll get to see the picturesque Avalanche Lake that’s nestled between two Adirondack Mountains, climb Mount Marcy, the highest peak in New York, and enjoy many other spectacular mountain views.
Bourn Pond - Stratton Pond Loop Backpacking Guide
This loop is located in Vermont’s Lye Brook Wilderness of the Green Mountain National Forest. You'll hike around two remote and picturesque ponds. Also, you’ll be able to climb up Stratton Mountain and enjoy spectacular views from the fire tower on the summit.